Step 1. Grab said mini,
 |
| This guys base is wider than a 25mm base |
Step 2. Trim the lead base down until it sits well within the lip of the plastic base,
 |
| I used side cutters to cut the lead base off. Don't be shy with how much you trim off either, the closer you can get to the feet the better. |
Step 3. Sit the mini on the plastic base,
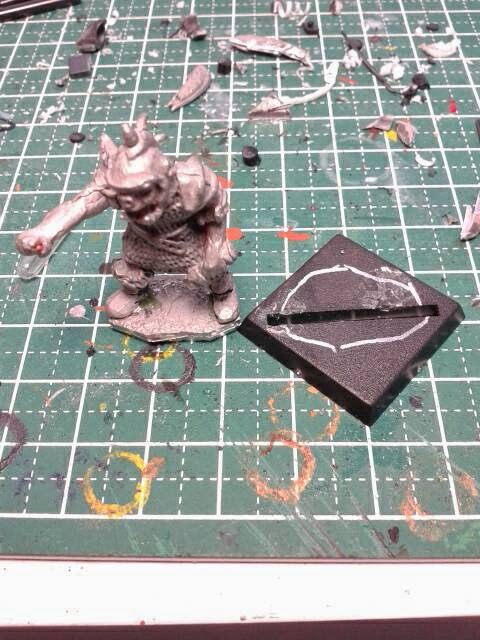 |
| Position the mini wherever you wish & then mark around it with a scribe or maker. |
Step 4. Grab a Coping saw,
 |
| The thin blade is ideal for making abrupt changes in direction while sawing. |
Step 5. Disconnect one end of the blade and thread it through the plastic base slot. Then reattach it to the Coping saw, ready for use,
 |
| Now, work your magic. Don't worry about cutting it exact, in fact, cutting it larger is preferable, you'll see why later. |
Step 6. Position the mini in the cavity,
 |
| As mentioned before, make sure it's a loose fit. |
 |
| Now, this bits important. Check to see if the lead base sits flush with the top of the plastic base. A little higher is ok, but lower, and the mini will end up looking like it's standing in a crater. As you can see in this pic it's too low. |
Step 7. (If required) Raising the height of the mini,
 |
| Get a scrap bit of plasti-card (or anything really) the correct thickness to raise the mini to the required height. |
 |
| looks much better now. |
 |
| Now super glue it to the base & trim the plasti-card to match the lead base. |
Step 8. Glueing it together,
 |
| This is the stuff I use for this type of application. It begins to set pretty fast (depending on how much hardener you add) & once fully cured it's as tough as nails. Make sure you use gloves though, not due to toxicity, but because the glueing process is a little fiddly. |
 |
| Lay down a smallish sheet of baking paper, mix up the putty, apply an excessive amount of it to the underside of the plastic base (you'll see why in a minute) and then push it down onto the baking paper. |
 |
| Now comes the bit that's a little fiddly. While holding the plastic base down with one hand, push the mini down into the cavity against the table, until no more putty oozes out from between the gaps. Let it sit until the putty has reached a similar consistency to that of Play-do. |
Step 9. Clean up,
 |
| Trim the excess off of the base with a hobby knife. |
 |
| Trim all the excess off of the underside of the base too. It's best to do all of the trimming while it's still curing. |
 |
| Job done. |
Important thing's to remember,
You could always use a Dremel or something similar to cut the plastic base up with, but they are great at making a mess. So I use my old trusty Coping saw for these little jobs.
Depending on how much hardener you use, it will start to go off from anywhere between a minute and five. So once you've mixed up your batch of putty don't fuck about.
Make sure you mix up more than you think you'll need. You want it to squeeze out from between the gaps.
Trim while it's semi hardhard. You can do it once it's fully cured, but it's harder to do then. I usually trim within a minute of application.
If I've not made something clear enough then feel free to ask.
Cheers.
Very helpful!
ReplyDeleteCheers��
No problem :)
DeleteAarghhh...Sacrilege to pre-slotta lead. Tidily done though:-)
ReplyDeleteAll for a good cause.
DeleteThanks for the compliment.