The next item I had to work on was the burnt out forest. This was achieved by procuring some
I also added some lichen shrubs around the board too. These were a necessary inclusion as there were quite a few wide open spaces that would have a) made the board a little boring, but more importantly they would have b) limited the strategic opportunities during play. Making mad dashes across no- mans-land (real or in imaginary games) almost always ends in death. I think the board looks a whole lot better for it anyway.
Once I received the doors in the mail I could set about finishing it off. These were from Brian Roes' "Trash Bash Bits" line and they worked a treat. I also had some miscasts that were generously donated to me by my mate Curtis from Ramshackle Games....a few jerry cans and doors. Once all these items were in place and seamlessly integrated into the board, ala more poo paper, I could begin painting the board up to its final stage.
I applied various washes and highlights to the ground area's and then spent an inordinate amount of time painting in all the details on the buildings and other terrain features. I felt like it made the board come alive. Kinda like when you paint a miniature, where the mini doesn't really look right until you've dotted the eyes. But in this case it had like a gazillion eyes!
After all the real work had been done to the board then came a bit of cosmetic work that would make a big difference to the overall appearance. And that was covering up the cardboard edging. I was wondering for quite a while how I was going to tackle this issue. Some of the ones that I briefly entertained were to just paint it black, or apply plastic sheets or kitchen laminate to it, or even line it with thin wood slats.....and a few others that I can't quite remember. But with all if these, bar paint, I would have ended up with sharp edges on the corners, something that I wanted to avoid. I ended up stumbling upon a better idea while out shopping with my wife. She was looking at material for knitting and making a tablecloth in a wholesale market. That's where I spied some heavy duty, almost denim like, fabric. I took a punt and bought a couple of metres of the stuff. It ticked all the boxes; cheap, black, durable, no sharp edges......and did I mention that it was cheap as well?
I made the pretend smoke coming out of the defence laser by first inserting a basic scaffold of plastic coat hangers into the building. I then hot glued fine steel wool onto it and gave it a similar treatment as I did to the burnt out forest. It looks a little too much like Don King IMO, but it'll do.
I made the "Papa's Place" sign as per Rob Hawkins great tutorial. Actually, if you look at his tutorial carefully and compare it against mine you can see that I cut a lot of corners. I used copper wire for mine and painted it all once I had it fully assembled. I'm pretty happy with how it came out all the same :)
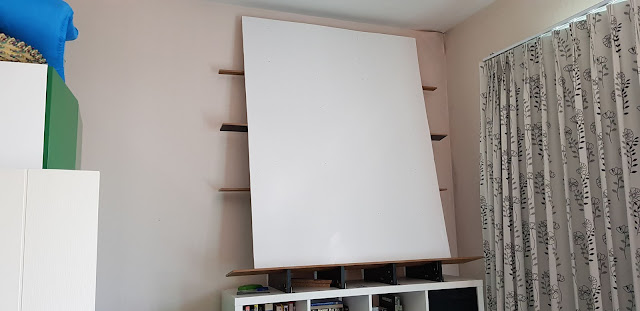
One of the unexpected jobs that I created for myself when I built this thing was the storage issue. At first I was going to build a frame above the stairwell to store it, but then I realised that I'd almost definitely damage it at some stage whilst bringing it to & from to my sons' room. So I made a leaning shelf out of an old bookshelf from work. I then fixed that to the top of my sons bookshelf. Job's a good'n.

I've only taken a couple all encompassing shots of the table, as I think it'll probably be more interesting, and more fun, to see close up shots of the different elements of the table in action. All beit BS posed shots :p


So, I can now call this project done. Onto the next board.......like fuck!!!
I'm glad I've now got a real board to play my pretend battles on. It's been a long time coming and I've learnt quite a few lessons along the way that will help inform how I construct the next board I make when I eventually move back home.
Cheers :)
I made the pretend smoke coming out of the defence laser by first inserting a basic scaffold of plastic coat hangers into the building. I then hot glued fine steel wool onto it and gave it a similar treatment as I did to the burnt out forest. It looks a little too much like Don King IMO, but it'll do.
I made the "Papa's Place" sign as per Rob Hawkins great tutorial. Actually, if you look at his tutorial carefully and compare it against mine you can see that I cut a lot of corners. I used copper wire for mine and painted it all once I had it fully assembled. I'm pretty happy with how it came out all the same :)
One of the unexpected jobs that I created for myself when I built this thing was the storage issue. At first I was going to build a frame above the stairwell to store it, but then I realised that I'd almost definitely damage it at some stage whilst bringing it to & from to my sons' room. So I made a leaning shelf out of an old bookshelf from work. I then fixed that to the top of my sons bookshelf. Job's a good'n.


I've only taken a couple all encompassing shots of the table, as I think it'll probably be more interesting, and more fun, to see close up shots of the different elements of the table in action. All beit BS posed shots :p


 |
| My son approves :) |
So, I can now call this project done. Onto the next board.......like fuck!!!
I'm glad I've now got a real board to play my pretend battles on. It's been a long time coming and I've learnt quite a few lessons along the way that will help inform how I construct the next board I make when I eventually move back home.
Cheers :)