 |
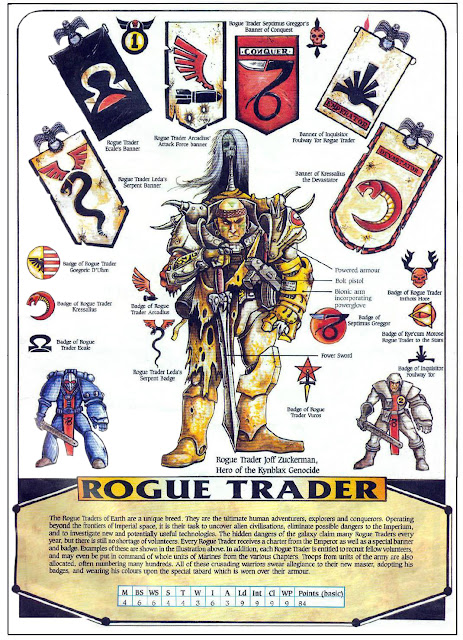
| Ain't no Rogue Trader as bad arse as this here hombre.....fact. |
I think you'd be pretty hard pressed to find a single hardcore RT fan out there who, at some stage in their life, hasn't gazed upon this illustration and thought to themselves "Gee I'd love to have a mini of him". But alas, as we all know GW never produced one......sigh :(
And unfortunately, for us mere mortals, he's not a model that can be easily converted up either. There's nothing in miniature that really comes close enough to replicating his "look". He's got sooooo many things going on with him, stylistically, that even if you were lucky enough to find said miniature, you'd still have your work cut out trying to find or make all of the other components required to make him.
So, why am I waffling on about this with you all then? I'm just stating the bloody obvious aren't I!? Well, I've been wanting to attempt to make him for at least a couple of years now, but, as I just mentioned, I could never find a suitable mini to base him off of. Fast forward a year or so, and I now
think I've managed to collect enough bit's & bob's to have a REAL crack at it.
But before I go on, some of you out there (most likely all!....I'm terribly slow with Internet goings on sometimes) will be aware that as part of
Diego's Space Raiders 3 Kickstarter campaign, Kev Adams sculpted a miniature version of him. And even though I think it's a really cool looking mini, and as much as I love Kev's work & have the up most respect for his awesome sculpting abilities, for me, it's still not close enough to the original. Yeah, I know, I can be a bit fussy sometimes :)
 |
| Kev Adams killa version. |
Having a closer look at the green I think I know why he chose to alter some of the sculpt from the illustration though. Most likely because it'll be cast up as a single piece miniature. And as such, considerations needs to be taken into account of undercuts & part thickness etcetera. But, luckily for me, I don't have any of those constraints. I'll be making my version as a one off, to be painted upon completion.....not cast. So hopefully, fingers crossed, I'll be able to get closer to the illo :)
I began by breaking down all of the design elements from the illustration into separate sections. To help me lock down each component that I'd need to find to build this sucker. Here they be;
As you can see from above I sorted him into ten different, unique and almost impossible to find elements to make him from, piece of cake huh? So next came the fun part......trying to find similar looking mini's and/or parts thereof, and figuring which of these would be useful to make Joff from. Here's what I've managed to cobble together so far;
Some of these items will most likely not be incorporated into the final mini, but their there anyway, just to aid in the visualisation process and to try out fits of varying scales.
Let's see what I've been up to so far;
The head & skull Sashimono will be mercilessly raped from the
Copplestone mini pictured below. This particular miniature, not surprisingly, was what triggered my enthusiasm for beginning the Joff project in the first place.
 |
If only his arms were in a better position I would've
used him as the basis for the whole conversion. |
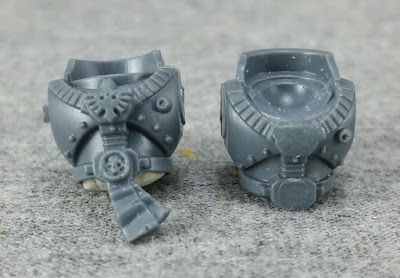
Breastplate is from a space marine. I've begun reshaping the collar and neckline area to suit the design better.....still a ways to go though.
 |
| Purity seal? What self respecting Rogue Trader needs one of them for!? |
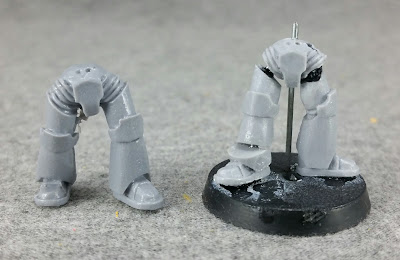
Legs are from a heavily modified set from forgeworld. I spent ages looking for a mini with a natural standing pose. It's virtually bloody impossible to find a miniature in that stance for some reason.
 |
| Now comes the part where GS and cursing comes in :) |
For this project there's several challenging sections for me to make/convert. The first is most probably the most obvious to you all; the Bionic arm with incorporated power fist. I scoured the net for ages trying to find a fist, hand, claw or any other suitable appendage that closely resembled it, but alas, no joy. So, in the end I settled for a ghoul hand. It's gunna take a lot of work, but I think this element, on it's own, has the potential to either make or break the overall look of the mini. Second will be the shoulder pads. Their not THAT complex, but they'll still require a fair amount of work to get their shape right. Then there's the sword. That's gunna be a real bugger, shaping the blade to fit the illustration & adding those bird skull thingy's to the hilt. And lastly comes the torn cloak....never done that before, so I'm gunna be looking online for help with that. So yeah, a few painful bits in the build. But as far as everything else goes, I'm not worried, everything else should be fairly easy....famous last words hey chums :D
I'm hoping to have him done for BOYL....this year! I'm not sure if this is wishful thinking on my part or just another one of my hobby delusions, but I'll give it a bash anyway :)
And erm er, bye to youse all.


