Thursday, 10 July 2014

Oldschool Dreadnoughts

Howdy folks,

When I was a young teenager growing up in Australia I used to read a British publication called "GM magazine" (and just in case you didn't know, the GM doesn't stand for General Motors, it stood for Games Master). They reviewed all things fantasy, be it LARP, tabletop wargaming, books, PC & Amiga games etc, but, they also used to show some of the "runners-up" of the Golden Daemon painting competition.

Well, amongst all of those lovely 2nd & 3rd place entrant's were quite a few of Paul Bensons' entries. His stuff was usually more than just a cool paint job. He was one of the pioneers of creating detailed custom bases..... I reckon he had shares with Milliput :). And just about every mini I saw of his also had some part of it either tweaked, swapped or modified in some way.

Why am I telling you this?

Well, I'm a bit of a tinkerer as well when it comes to miniatures, It's what keeps me interested in the hobby. Being able to create something different is a major reason why I still enjoy it so much.

There was one dreadnought that Paul Benson did that really caught my imagination. It was a pretty simple conversion, but it looked great to me. I don't have the original photo from the GM magazine, as I foolishly cut out all of the cool pictures as a teen..... their long gone now, sigh :(

But, luckily it was photographed and published in "Fantasy Miniatures 1988" (a publication put out by GW, showcasing some of the stand-out entrants to the Golden Demon competition).

Here tis, the one on the right. Face plate & custom flamer was all it took to make this a favourite conversion to me. The one along side had a subtler modification - rocket backpack - but it's a good illustration of how Paul Benson found it difficult to leave standard miniatures alone.


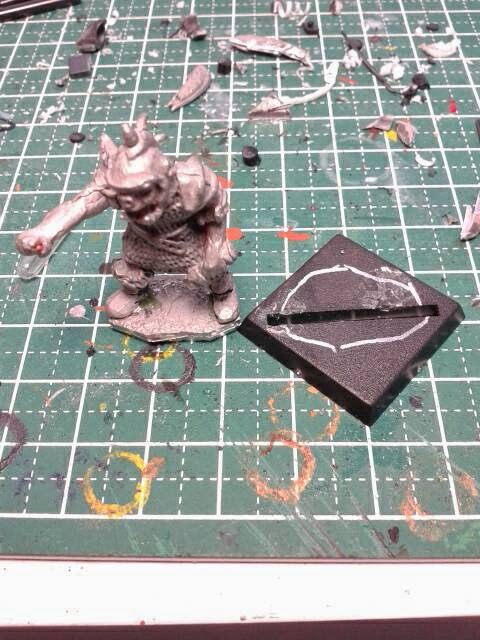
So, after that long winded intro, here's my "tinkering" output,

Here he be! I think he looks a lot more threatening in this pose compared to the original.

Here you can see his right arm has been straightened, as well as his legs.

I had a go at hand painting an Ultramarines insignia, as well as "targeting eyeballs"

I think for this guy all I did was straighten his legs.

And added the ubiquitous corny slogan to his body.

I'm quite happy with how this desert colour scheme worked out on this guy.


Apart from the obvious, I modified his legs to make it look like he's walking forward.

A scratch built Las-cannon on the right.

 And a MechWarrior rocket arm.....sorry, a "rokit" arm on his left!


For the 1st & last one, I tried to emulate the colour scheme of the Dreadnought's pictured in Dave Andrews awesome diorama:

If you look close enough you can see the "targeting eyeballs"


I painted these the Oldschool way......dry brushing several times, in between a couple of ink washes. For these minis I think it suits them.

So until next time,

toodle pip!

Saturday, 5 July 2014

My rusting & weathering tutorial

Hello fellow lead fiends,

This is a tutorial written especially for Axiom & Just John (and anyone else who's interested too for that matter), as they were too impatient to wait until I returned home from my holiday :P

There won't be any pics with this one guys, sorry, but I'll try my best to describe the process.


STUFF NEEDED:


1. Pigment - Rust & Dark brown
2. Acrylic paint - I used Vallejo Rust & GW Scorched brown
3. Benzene
4. Oil paint - Black & Dark brown
5. Two old brushes, size 1, or there abouts.
6. Two small cups - to mix paint in.
7. One largish soft bristle brush.
8. A small dish that won't get eaten up by benzene i.e. glass, ceramic or metal.
9. Liquitex Matte Varnish.


RUST RECIPE:


Step 1. Prepare the surface as per usual for metal (prime black, drybrush boltgun metal).
Step 2. Clear coat it with gloss varnish. Let it dry completely before continuing with the next step.
Step 3. Into one of the small cups mix equal volumes of rust paint, rust pigment & water together.
Step 4. Repeat step 3 for the other colour.
Step 5. Using an old paint brush for each of the paint/pigment mix, apply the paint in a random fashion, using a stippling action. Make sure to wipe most of the paint off "drybrush style" before you apply it though. Make sure to use only one colour with each pass.
Step 6. Repeat with the other colour after the first coat has dried a little.
Step 7. Keep going back over it, alternating between the colours, until your satisfied with the effect.


Now, a few clarifications about this technique;

About the pigment/paint concoction, I do this for a couple of reasons, the first is that I find that when I use pigments on their own I end up with more on my painting desk than on the mini. The other reason is that I can control (with the brush) how thick/thin I want to apply it. Rust is an organic process -it should look irregular. I find that it looks a hell of a lot more convincing to me when I use this technique.

Once its all dried then I rub the rust back in places that wouldn't get a chance to rust up (such as rungs of ladders, handles, areas of foot traffic etc) with my finger, to expose the metal underneath. If I can't get into these areas then I drybrush them with boltgun metal to achieve the effect.

Job Done.


OIL STAIN RECIPE:


For this part I followed a tutorial over on Buypainted. The only thing I did differently was to go nuts with the oil paint, whereas he was only after small oil stains, I was wanting a more "oil leak" & worn out effect.

If you've never used oils before I'd strongly suggest that you give them a go. They weren't that difficult to use and they took a while to dry out so I had ages to work with them.

After I allowed this sucker to dry overnight I hit it with matte varnish. I didn't use Testors Dullcote because it's just too damn matte! Oh, and I sprayed it on too, as brushing it on would only encourage the paint & oils to smear.

And that's it really. If you've got any queries or questions about the process I used then ask away and I'll do my best to answer you.


Bye for now.


Wednesday, 25 June 2014

Tada!!!!!

Good morning/afternoon/evening, take your pick.

I put the finishing touches on the walker last night. It was quite a lot harder to know when I should call this build "done". But I'm mostly happy with the outcome.

Here be pic's;

Proudly standing beside his captured walker.

I think I painted that sign about five different colours before I finally settled on black.

I did the rust & oil stains with pigments, oil paint & acrylics.

The dreaded headlights, I think they turned out ok.

Good old Mutie, plying his honest trade on the outskirts of Helsreach.

I made the gun detachable, as I knew it would be the first
 thing to get broken off otherwise.

This was the first time I tried using oil paints, I'm now a convert, they were
relatively easy to use and I think the effect looks pretty convincing.

Must be quite terrifying for the slaves looking up at that from ground level.

The slave that tried to get away.

The ladder was originally going to be hydraulically operated, but I thought that
was a little too "high tech", so I made up a simple chain operated thingy instead.

It was a little difficult to know where the rust & oil stains should meet, but I
thought that there should be some rust running off of the platform
onto its legs.

The chipped paint ended up looking quite alright after some extensive
weathering was applied to it.

I made the ladder from bits of sprue, plastic spoons, necklace & a model kit.

Seats five to six scum bags (28mm minis) in relative comfort.

Rust prevention system (oil leaks), desert style.

Coolant leaks & a space marine head on a spike.


A few things worth mentioning about the build;

The headlights? 

This was a pure fluke, the day before I finished it I was at the supermarket and came across these "feet stickers"....the kind you stick on the feet of chairs & speaker's to stop them scratching the floor. They were clear and the right size, but when I stuck them on they looked a little strange. I painted a couple of thin stripes on the front of them to replicate a headlight. I think they look ok.

The sign?

I wanted to write the same wording that was in the illustration, but no matter how hard I looked, I couldn't make out the middle word. I thought it must be "the", but it didn't look like it!  

I decided I'd try the direct approach. I had a look on the net and found that Carl Critchlow (the illustrator of Helsreach in Rogue Trader) had his own website. I emailed him my strange question & he was kind enough to tell me what the word was..... thanks a bunch Carl :)

The chipped/flaking paint?

This was another first fit me. I'd never tried painting this much worn out paint before, but I did have a couple of saved images of other people's work that looked the goods. My first attempt turned out looking like fluffy green clouds. After getting some constructive criticism from my pal, I went back to the drawing board. After I had gone back over the entire howdah and sharpened up all the edges it looked a whole lot better.

So, all in all it's been quite a cool little project. It's the biggest & most complex build I've ever attempted so far. It required a lot more planning than painting a single mini that's for sure!

I learnt a fair bit and I'm pretty happy with the final result. 

Cheers.

Thursday, 19 June 2014

Helsreach walker getting close.

I've got exactly one week to get this thing done (as well as three dreads), that is painted, varnished & dried for it's long journey back home with me.

Here's my solution to painting headlights, Google images, print, & glue on.

It always seems strange to me that if you don't paint wire to look like wire,
then it ends up looking out of place, but that's miniature painting for you.

I'm trying a chipped & flaked paint effect, but i still have to add rust effects before it will/should look convincing.

I'm going to write something on this sign, still not sure what it will be yet.

Here's the arse end of the beast.

This is definitely the biggest wargaming model I've ever attempted. I'm pretty happy with my progress so far, but a little worried that I won't have it finished in time.

Better stop blogging & get back to work then hey!

Cheers big ears :)

Friday, 13 June 2014

Kornate Space Marines

The paint jobs pretty basic on these dudes, but I'm glad their tabletop ready. There's nothing quite as disheartening (as a wargamer) seeing unpainted or half painted minis glaring at you everytime you walk past your shelf.


These guys had been base coated since I was a teen. I was originally going to paint them up as blood angles, but I'm over them now.....every man and his dogs painted up those bloody things at least once in their life time!

Their all sporting khorne symbols on their shoulder pads now, proudly denoting allegiance to their patron.

That's enough of the RTB01 marines for now, I've painted up almost 40 of them. The next time I do some I think I'll make some characters and/or create a new chapter.

I'm just about ready to prime the walker (christ it's a bugger painting large models!).

Anyway, good evening & good night fellow grognards :)


Tuesday, 10 June 2014

Helsreach walker progress.

I'm getting close to finishing off the walker. I've got to get a riggle on too, as this things gotta be ready to game with in under a month!

Here's the progress so far;

I've done the motor, control panel, ladder and headlight brackets.


Here's a close up of the ladder. It's a folding type that will be hoisted/lowered by chain.


Here you can see the headlight brackets with bolt heads (cut-off plastic sprue).


The innards of the beast. I put down some plastic mesh for the flooring & wire for
cable's. I decided to go a bit silly with the "control panel", deciding that a steering
wheel with pedals would make an amusing way of moving it about. I can picture
the driver mashing the accelerator to the floor, forcing the walker to running
across the desert landscape :D


All that's left is to do is add some hand railing, a heavy machine gun to the side turret & tiddy up a few things and she'll be ready for paint.

Groovy.

Monday, 9 June 2014

Pre-slotta bastard!

Ever had an old pre-slotta mini that you wanted to fit onto a plastic base, but the lead base was wider than the confines of the plastic one? Well, have I got the solution for you! Or me? Either way, this is what I do;


Step 1. Grab said mini,

This guys base is wider than a 25mm base


Step 2. Trim the lead base down until it sits well within the lip of the plastic base,

I used side cutters to cut the lead base off. Don't be shy with how much you
 trim off either, the closer you can get to the feet the better.


Step 3. Sit the mini on the plastic base,

Position the mini wherever you wish & then mark around it with a scribe or maker.


Step 4. Grab a Coping saw,

The thin blade is ideal for making abrupt changes in direction while sawing.


Step 5. Disconnect one end of the blade and thread it through the plastic base slot. Then reattach it to the Coping saw, ready for use,

Now, work your magic. Don't worry about cutting it exact, in fact,
cutting it larger is preferable, you'll see why later.


Step 6. Position the mini in the cavity,

As mentioned before, make sure it's a loose fit.
Now, this bits important. Check to see if the lead base sits flush with the top
of the plastic base. A little higher is ok, but lower, and the mini will end up
looking like it's standing in a crater. As you can see in this pic it's too low.


Step 7. (If required) Raising the height of the mini,

Get a scrap bit of plasti-card (or anything really) the correct thickness to
raise the mini to the required height. 

looks much better now.
Now super glue it to the base & trim the plasti-card to match the lead base.


Step 8. Glueing it together,

This is the stuff I use for this type of application. It begins to set pretty fast
(depending on how much hardener you add) & once fully cured it's as tough
as nails. Make sure you use gloves though, not due to toxicity,
but because the glueing process is a little fiddly.
Lay down a smallish sheet of baking paper, mix up the putty,
apply an excessive amount of it to the underside of the plastic base
(you'll see why in a minute) and then push it down onto the baking paper.
Now comes the bit that's a little fiddly. While holding the plastic base down
with one hand, push the mini down into the cavity against the table, until no
more putty oozes out from between the gaps. Let it sit until the putty has
reached a similar consistency to that of Play-do.


Step 9. Clean up,

Trim the excess off of the base with a hobby knife. 

Trim all the excess off of the underside of the base too. It's best to do all of
the trimming while it's still curing.
Job done. 

Important thing's to remember,

You could always use a Dremel or something similar to cut the plastic base up with, but they are great at making a mess. So I use my old trusty Coping saw for these little jobs.

Depending on how much hardener you use, it will start to go off from anywhere between a minute and five. So once you've mixed up your batch of putty don't fuck about.

Make sure you mix up more than you think you'll need. You want it to squeeze out from between the gaps.

Trim while it's semi hardhard. You can do it once it's fully cured, but it's harder to do then. I usually trim within a minute of application.


If I've not made something clear enough then feel free to ask.

Cheers.